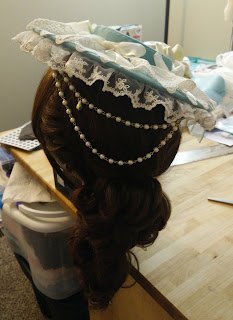
This is a guide/walkthrough of how I made my canotier for my La Robe Vert Clair coordinate. I am by no means an expert at making hats, so if you have any tips or tricks to add, I'd love to hear them! Additional resources are listed at the end of this guide.
Supplies required:
Buckram
Millinery wire
Desired fabric
Lace (Taobao)
Trims (MJTrims.com)
Spray Adhesive (Amazon)
Curved needle (Amazon)
Extra useful supplies:
Compass and measuring tape
Chalk/soluble marker (Amazon)
Sewing Clips (Amazon)
Step 1: Decide on the size of your hat and draw out a pattern. I used a large bowl for sizing the brim and a miso soup bowl for sizing the tip of the crown. You can also draw a circle of your desired size using a compass or measuring tape. I used a wig head to help with sizing after cutting the pattern out. My hat brim was around 10.5" and the tip was around 4".
Step 2: Trace your pattern onto the buckram and cut it out. Trace the tip pattern into the center of the brim.
Step 3: Measure out your seam allowance (1") and trace into the center of the brim. This will aid connecting the brim to the crown.
Step 4: Cut out the center of the brim.
Step 5: Measure the circumference of your brim and cut wire to length. Sew the wire along the edge of the brim. I used my sewing machine on a zigzag stitch slowly walking my machine and turning the brim. If you find this tedious, you can hand-sew the wire to the brim. The wire will add support to your brim to prevent it from being flimsy.
Step 6: Do the same for the tip.
Step 7: Determine the height you would like for your side-band and cut it out of buckram. Keep in mind you will need 1" of seam allowance for attaching the side-band to the tip, but you do not need seam allowance on the bottom as you added it onto the brim. The length will be the circumference of your tip piece with seam allowance.
Step 8: Sew wire along the edge of the side-band.
Step 9: Cover the wired edges of the brim, tip, and side-band with bias tape or similar fabric. The goal is a smooth finish!
Step 10: Fit the side-band to the tip and clip into place. Sew the side-band into a circle.
Step 11: Trim into the side-band up the seam allowance creating tabs for the tip to be sewn to.
Step 12: Sew the tip onto the side-band creating the crown.
Step 13: Cut out your fabric pieces adding seam allowance. Cut out a second piece for the underside of the brim if you would like to use my method to finish the bottom.
Step 14: Using spray adhesive on the tip of the crown, adhere your fabric to the tip (spray the adhesive to the buckram to prevent buildup of glue on your fabric).
Step 15: Iron your fabric side-band to create a clean edge.
Step 16: Using clips, sew the fabric side-band to the tip using a ladder stitch. Create a nice seam where the fabric side-band meets.
Step 17: Using spray adhesive, adhere your fabric to the brim.
Step 18: Carefully cut out the fabric center of the brim. Then using a basting stitch, gather the edge of the fabric brim towards the unfinished side.
Step 19: Using the second piece of fabric for the brim, size it to the brim with a basting stitch. Don't pull it too tight as you will need to slide off the fabric. *Note: there are other ways to finish the bottom of a brim, examples being ruffled, pleated gathers, etc. You can easily substitute in your preferred method here.
Step 20: Gently remove the brim from the bottom brim fabric. Use sewing clips to aid the process.
Step 21: Gather the lace for the edge of the brim and sew it to the edge with the seam allowance facing the unfinished side of the brim. *Photo shows having the two pieces joined as I had forgotten to add the lace first.
Step 22: Align and clip the bottom brim fabric to the brim and sew it into place. *Again, missing lace in photo. Don't repeat my mistake!
Step 23: Baste to gather the fabric around the crown.
Step 24: Cut out the fabric center of the brim leaving seam allowance. Now cut tabs into the seam allowance of the brim and using a curved needle, sew the brim to the crown anchoring the buckram and fabric tabs to the crown. Be careful not to poke through the opposite side of the crown and brim.
Step 25: Finish the inside of the hat. There are a number of ways to do this, I simply gathered fabric neatly inside and turned the edge of the fabric in as I was sewing. You also can add ribbons here to aid in wearing the hat. I chose alligator clips which I added later.
Step 26: Now add your trims! I made ribbon roses and buds, along with adding lace and bows to trim my hat. Feel free to get creative or use brands for inspiration (My hat was heavily inspired by BTSSB's Henrietta Canotier). You can use braiding to hide the seam along the top if you wish, add ribbons, feathers, or fake flowers.The Final Result!
I also added small loops to clip on pearl attachments (borrowed from another dress in my closet). Here is the end result. *Please forgive my messy sewing room! Experimenting with trims always seems to end this way...
If you have any tips, tricks, comments or how this tutorial worked for you, please leave a message below. I'd love to hear from you!
Resources:
DeniseNadineDesign.com Buckram Hat Tutorial
Threads Magazine Fascinator Base Tutorial
HatSupply.com Tutorials


I'm no professional at making hats
ReplyDeleteProceeds to make a professional level hat